


- 1.界面设置
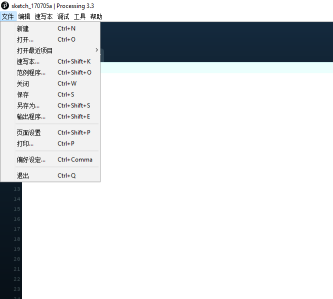
a其中最主要的是偏好设置(preference)
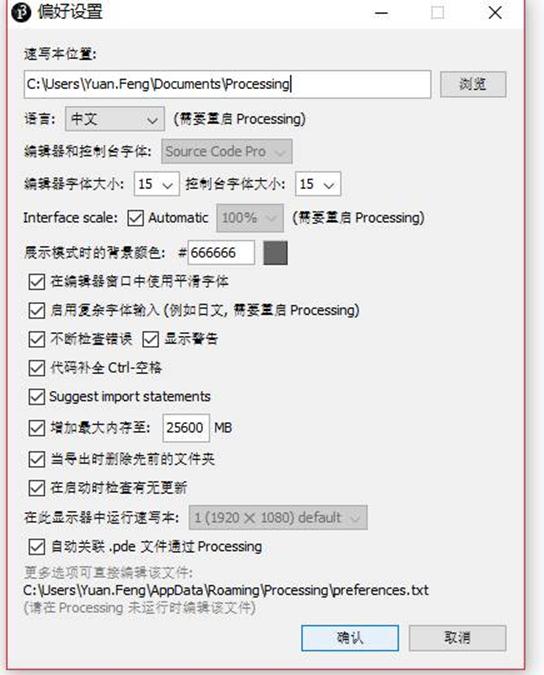
你可以通过 调整编辑器字体大学和控制台字体大小来调整到最适合的大写,这样敲代码起来会更加的舒服.
同时下面有2项是一定要更改的,一个是suggest import statements,这个在后来快速引用一些库里面的函数或类,会非常的方便,他会根据你写的代码自动推荐导入库,。另一个是增至最大内存,这一项当然越高越好,我也不知道软件支持的上线时多少=。=
1. 开始编写程序
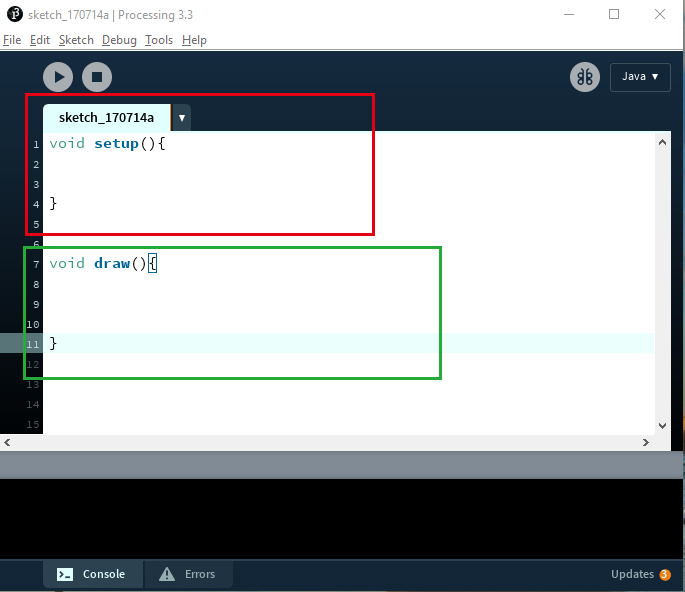
processing软件的截面有两种主要的功能:
第一个是void setup:所有在里面的写的程序只会运行一次。
第二个是void draw:所有在理的程序没一帧都会运行一次。
processing中的x,y轴是如下显示的
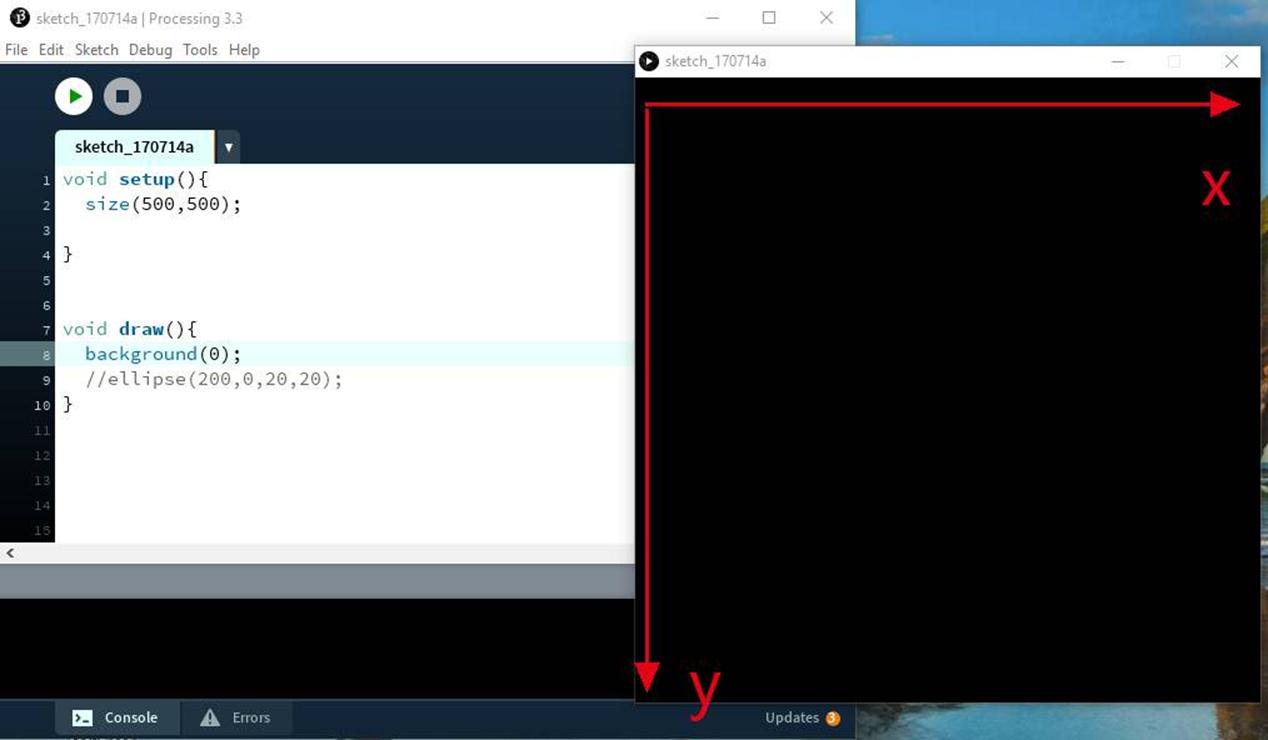
举一个很简单的例子:
我们通过在draw里面创建一个小球,小球从左边到右边移动,这时候就需要每一帧给小球X坐标上加一个数来实现移动效果。所以不能在void setup中给小球的坐标加上定值而需要在void draw中给小球的x坐标每一帧加上一个定值。
代码如下:
int x=0;
int y=300;
int x_add=1;
void setup() {
size(500, 500);
}
void draw() {
background(0);
x=x+x_add;
ellipse(x, y, 20, 20);
}
同时你们也可以想一想把background(0)或者把x=x+x_add;
ellipse(x, y, 20, 20); 移动到void setup中会发生什么情况。。。这样能够更好的理解void setup()和void draw()。
最后, 提醒在最开的int x=0等是设置参数的地方,一般在最开头的时候设置,以后是有的function都能直接调用这个参数,而在function里面的,例如void setup()里面或者void draw()里面设置的时候,只能在function中使用,其他地方是不能识别的。(这是关于参数定义域范围的,在以后的练习中会有更深刻的体会)
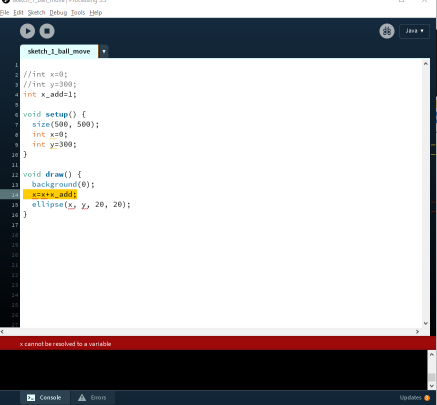
额外福利:
有没有觉得白色的processing看的不开心,要是黑色的打字界面就好了,高大上很多,这里可以通过直接改processing的ui来实现.只需要把下面的theme保存到安装processing下的lib文件中,记得保存原有的them主题哦。。。。效果如下
them的内容:
# ——
#nyo_processing_theme
#rename the file as “theme.txt”
# replace it with Processing 3/Contents/java/lib/theme.txt
# ——
# STATUS
# Status messages (1 file added to sketch, errors, etc)
status.notice.fgcolor = #CFD2D2
status.notice.bgcolor = #404040
status.error.fgcolor = #ffffff
status.error.bgcolor = #e34c00
status.edit.fgcolor = #000000
status.edit.bgcolor = #f1b500
status.font = processing.sans,plain,13
# HEADER TABS
# Settings for the tab area at the top.
header.text.font = processing.sans,bold,14
header.text.selected.color = #ffffff
header.text.unselected.color = #808080
header.tab.arrow.color = #ffffff
header.gradient.top = #181818
header.gradient.bottom = #181818
header.tab.selected.color = #333333
header.tab.unselected.color = #252525
header.tab.modified.color = #02ba4e
# FOOTER TABS
footer.text.font = processing.sans,bold,12
footer.text.selected.color =#02ba4e
footer.text.unselected.color = #acaeb2
footer.tab.arrow.color = #ffffff
footer.gradient.top = #181818
footer.gradient.bottom = #181818
footer.tab.selected.color = #323232
footer.tab.unselected.color = #323232
# updates orange #eb7f15
# CONSOLE
# The font is handled by preferences, so its size/etc are modifiable.
console.color = #000000
console.output.color = #cccccc
# text color for errors printed in the console
console.error.color = #d9211e
# TOOLBAR BUTTONS
buttons.bgcolor = #000000
# for the debug and mode buttons
reversed.gradient.top = #181818
reversed.gradient.bottom = #181818
## size of divider between editing area and the console
#divider.size = 0
## the larger divider on windows is ugly with the little arrows
## this makes it large enough to see (mouse changes) and use,
## but keeps it from being annoyingly obtrusive
#divider.size.windows = 2
divider.height = 9
divider.color = #CCCCCC
divider.dot.diameter = 3
divider.dot.color = #505050
# TOOLBAR BUTTON TEXT
toolbar.rollover.font = processing.sans,plain,12
toolbar.rollover.color = #ffffff
toolbar.gradient.top = #181818
toolbar.gradient.bottom = #181818
# MODE SELECTOR
#mode.title.font = processing.sans,bold,15
mode.title.font = processing.sans,plain,12
mode.title.color = #ffffff
# outline color of the mode button
#mode.button.color = #ffffff
#mode.button.gap = 13
#mode.arrow.width
#mode.background.color = #3D5362
# stolen from gradient bottom
mode.background.color = #121212
mode.outline.color = #3a505e
# EDITOR – DETAILS
# foreground and background colors
editor.fgcolor = #ffffff
editor.bgcolor = #181818
editor.gradient.top = #181818
editor.gradient.bottom = #181818
# highlight for the current line
#editor.linehighlight.color=#e2e2e2
editor.linehighlight.color=#323232
# highlight for the current line
editor.linehighlight=true
editor.caret.color = #ffffff
editor.selection.color = #323232
# area that’s not in use by the text (replaced with tildes)
editor.invalid.style = #7e7e7e,bold
# little pooties at the end of lines that show where they finish
editor.eolmarkers = false
editor.eolmarkers.color = #999999
# bracket/brace highlighting
editor.brackethighlight = true
editor.brackethighlight.color = #FF9408
editor.gutter.text.font = processing.mono,plain,11
#editor.gutter.text.color = #acaeb2
#editor.gutter.text.color = #acaeb2
editor.gutter.text.color = #acaeb2
# marker for breakpointed lines in left hand gutter (2 ascii characters)
editor.gutter.breakpoint.marker = <>
editor.gutter.breakpoint.marker.color = #4a545e
# marker for the current line in left hand gutter (2 ascii characters)
editor.gutter.currentline.marker = ->
editor.gutter.currentline.marker.color = #e27500
# bgcolor for the current (highlighted) line
editor.gutter.linehighlight.color=#333333
# left- and right-hand gutter color
editor.gutter.bgcolor = #181818
# color of vertical separation line
#gutter.linecolor = #e9e9e9
# space (in px) added to left and right of gutter markers
editor.gutter.padding = 3
# squiggly line underneath errors in the editor
editor.error.underline.color = #C40E0E
# squiggly line underneath warnings
editor.warning.underline.color = #ffc30e
# lines next to the scrollbar showing where errors are located
editor.column.error.color = #9F1613
editor.column.warning.color = #ffc30e
# not in use?
#breakpoint.bgcolor = #f0f0f0
#currentline.bgcolor = #ffff96
errors.header.font = processing.sans,plain,12
errors.header.bgcolor = #EBEBEB
errors.header.fgcolor = #484848
errors.row.font = processing.sans,plain,12
errors.row.fgcolor = #484848
errors.row.bgcolor = #FFFFFF
errors.selection.fgcolor = #242424
errors.selection.bgcolor = #E5E5E5

- 本文固定链接: http://iprocessing.cn/2017/08/11/献给processing爱好者的教程【2】-界面和参数介绍【卡/
- 转载请注明: 卡萨布兰卡 于 Processing编程艺术 发表
《献给Processing爱好者的教程【2】—-界面和参数介绍【卡卡】》有 2 条评论